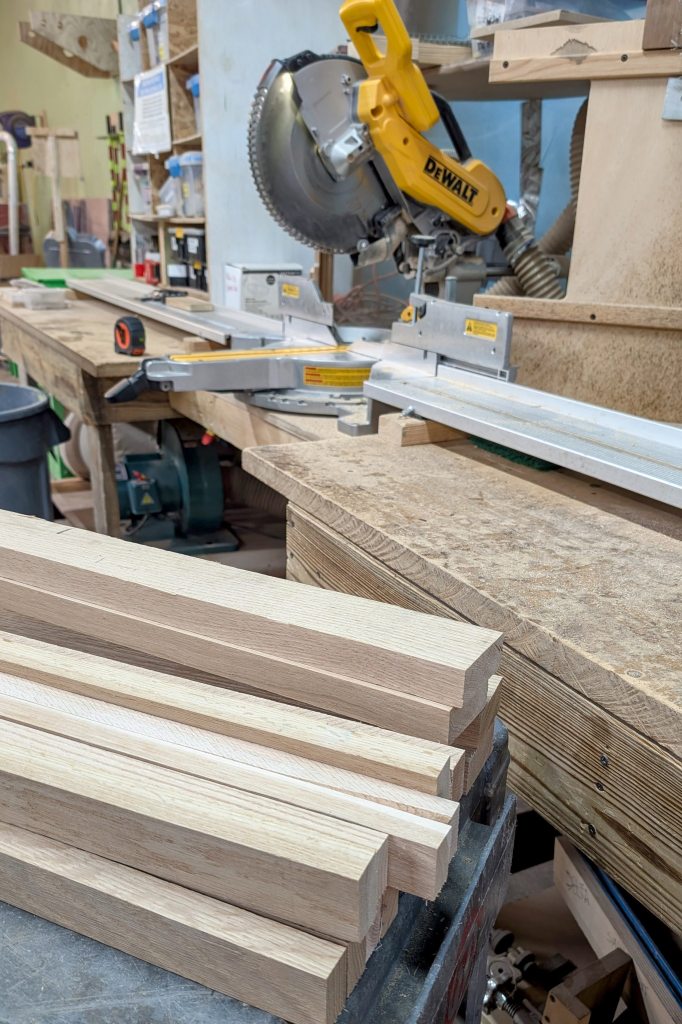
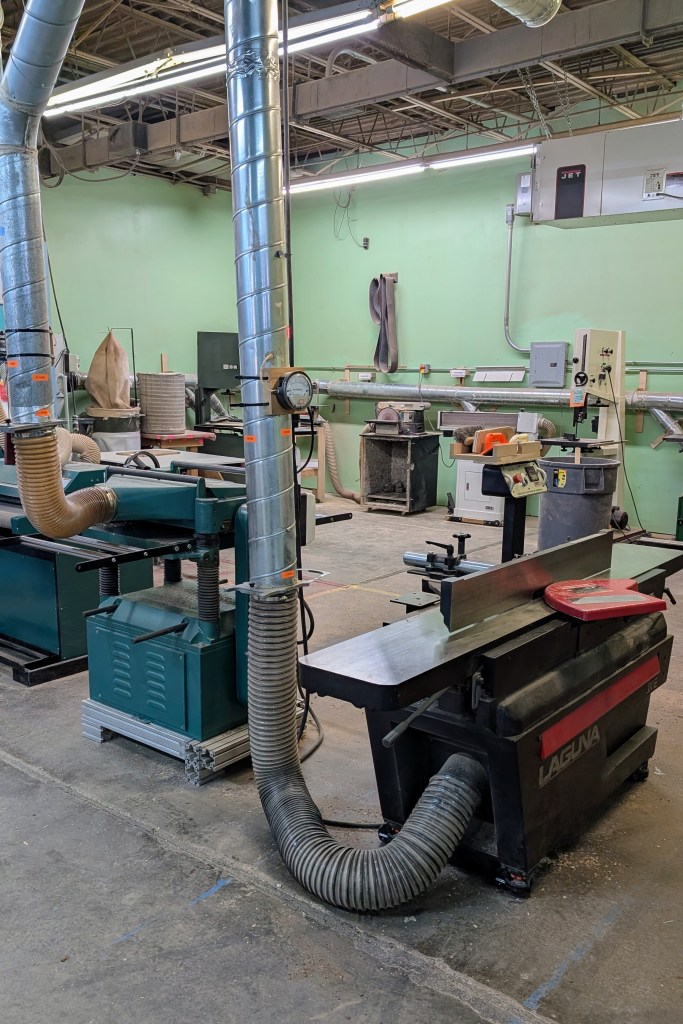
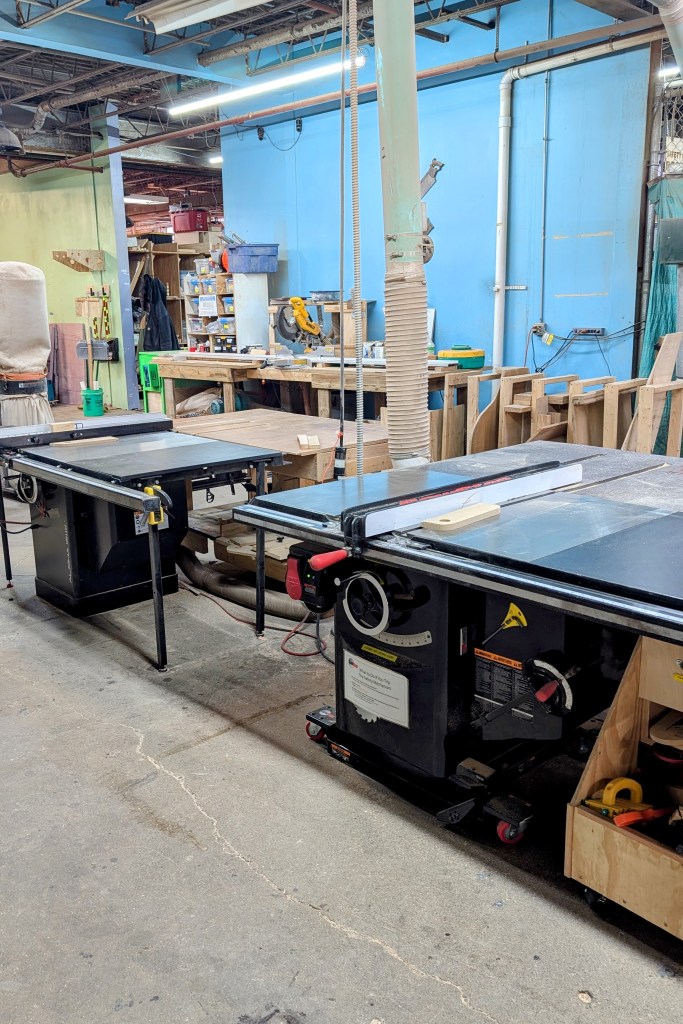
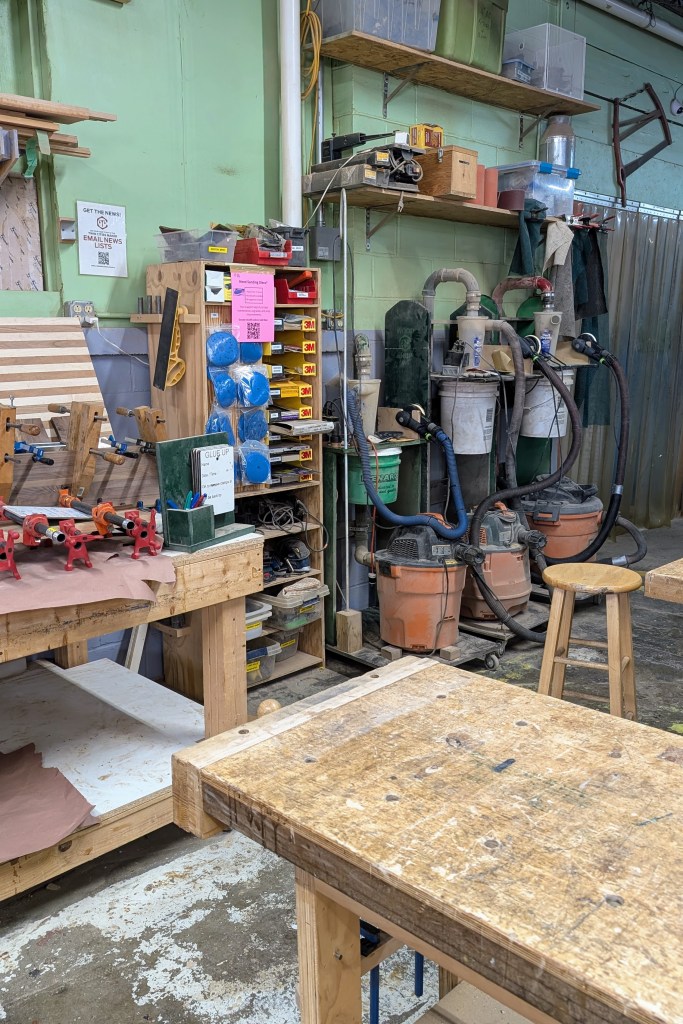
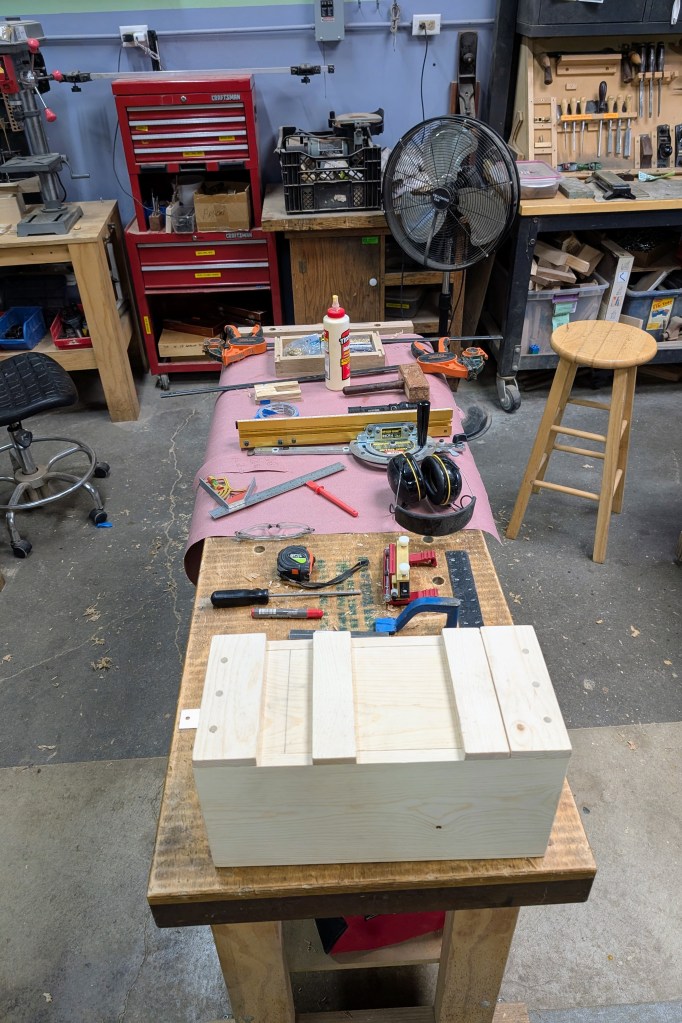
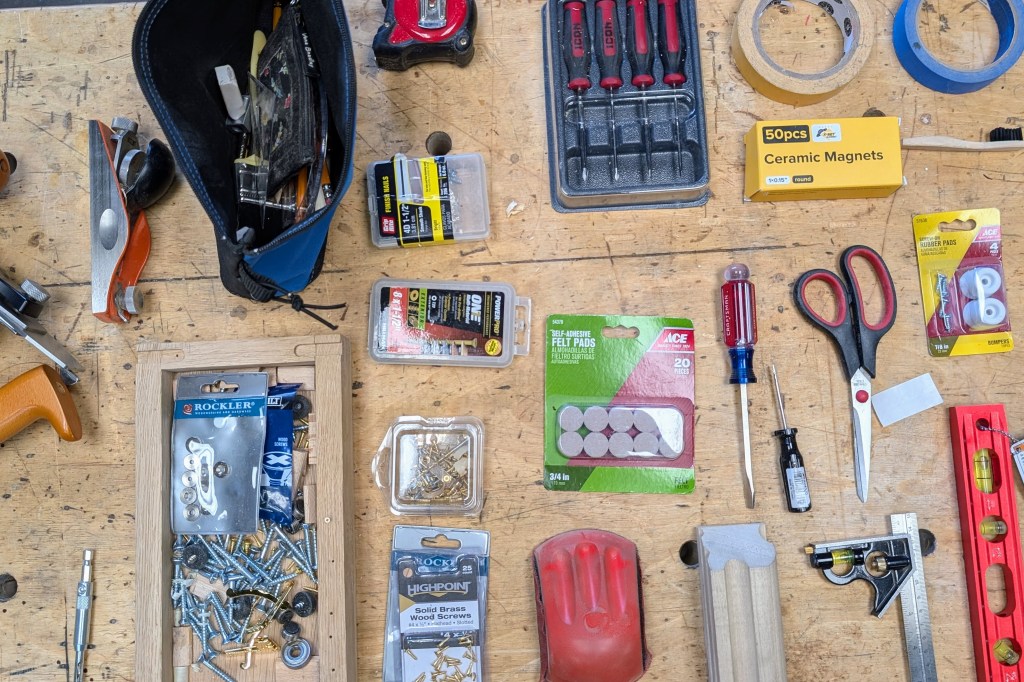
I take my craft seriously and work out of a fully outfitted shop. I want to share some photos of the shop and tools that allow me to make high quality furniture.
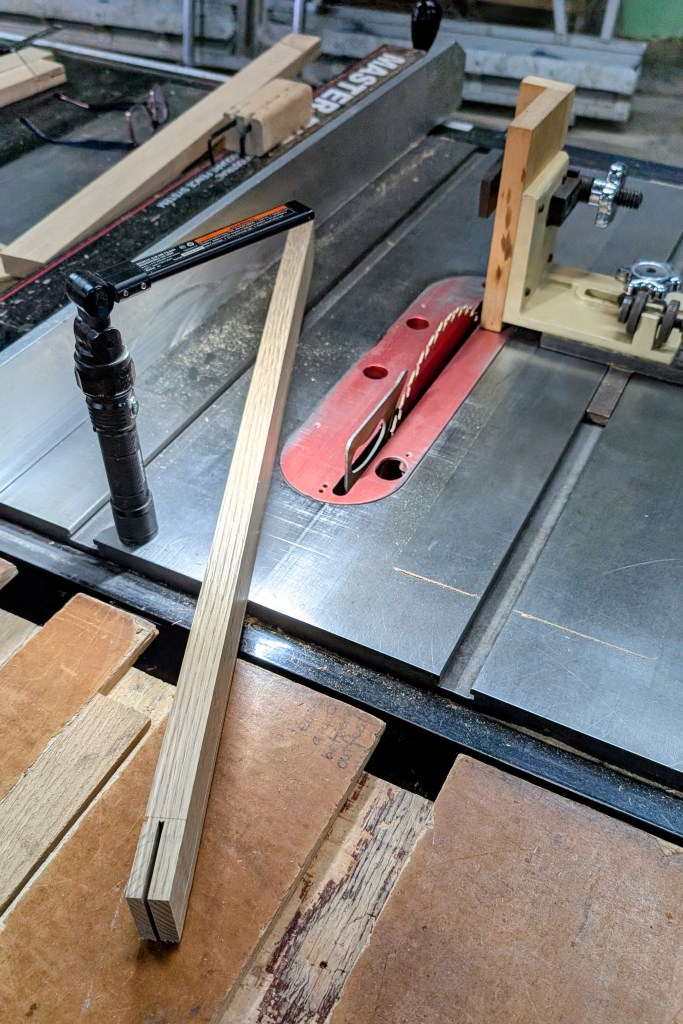
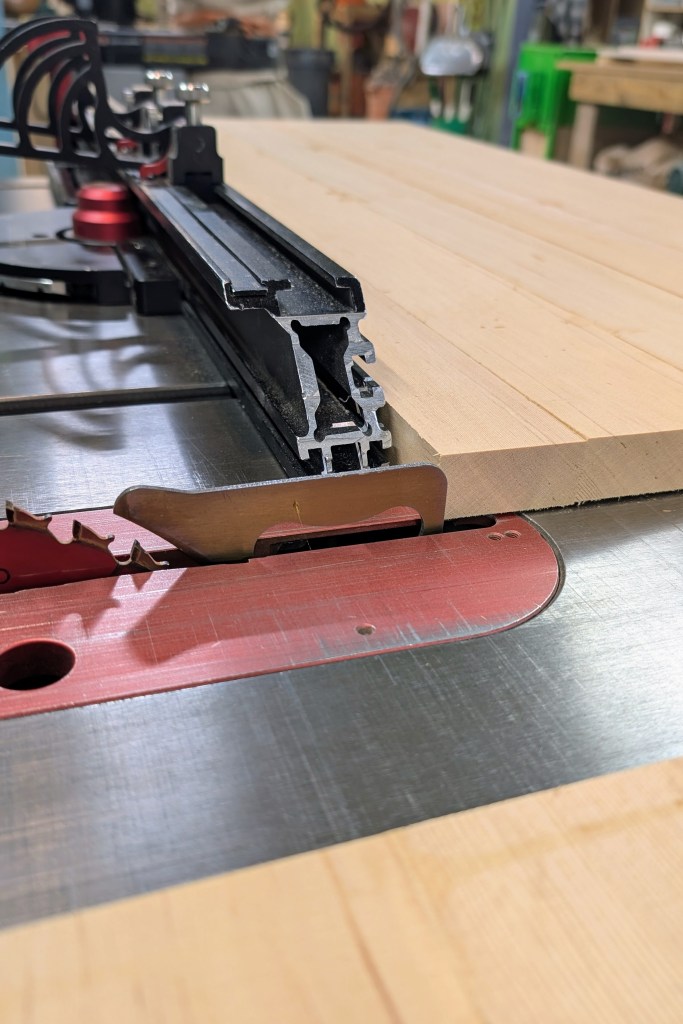
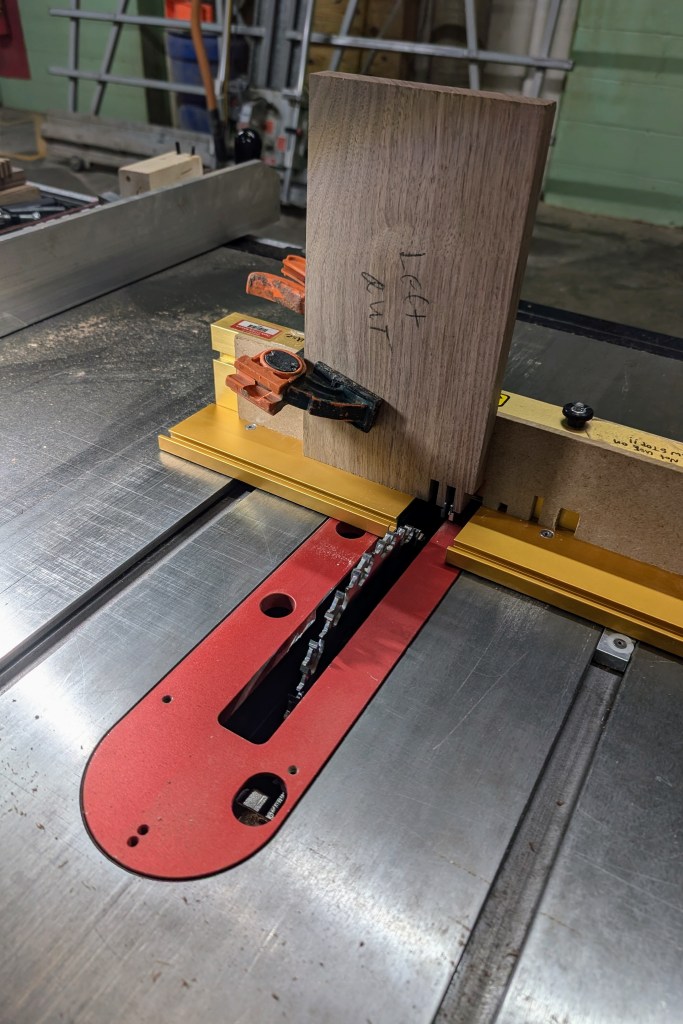
Process rough boards into true milled material for assemblyThickness planer and brand new inch joiner for millingProfessional Sawstop and Harvey cabinet table sawsPrecision tenon jig for tight bridle and castle joineryHigh capacity precision miter gauge and table saw sledPrecision box joint jig make exceptional boxesVariety of drill presses and high quality mortising machineFestool sanding stations get surfaces flat and ready for finishLarge workbench outfitted with the best hand planes and chisels
Since 2022, I work out of Twin Cities Maker which acts as an incubator for my studio providing the best possible space and tools available. I work in community with the some of the best and most innovative makers in the Twin Cities.
My clients benefit from their experience as I leverage their skills to improve the quality of my craft. They also act as quality control always pushing me to build my work using tested techniques and materials.
My goal for 2026 is to design and make many new and different objects. Here is a sample of my most recent work.
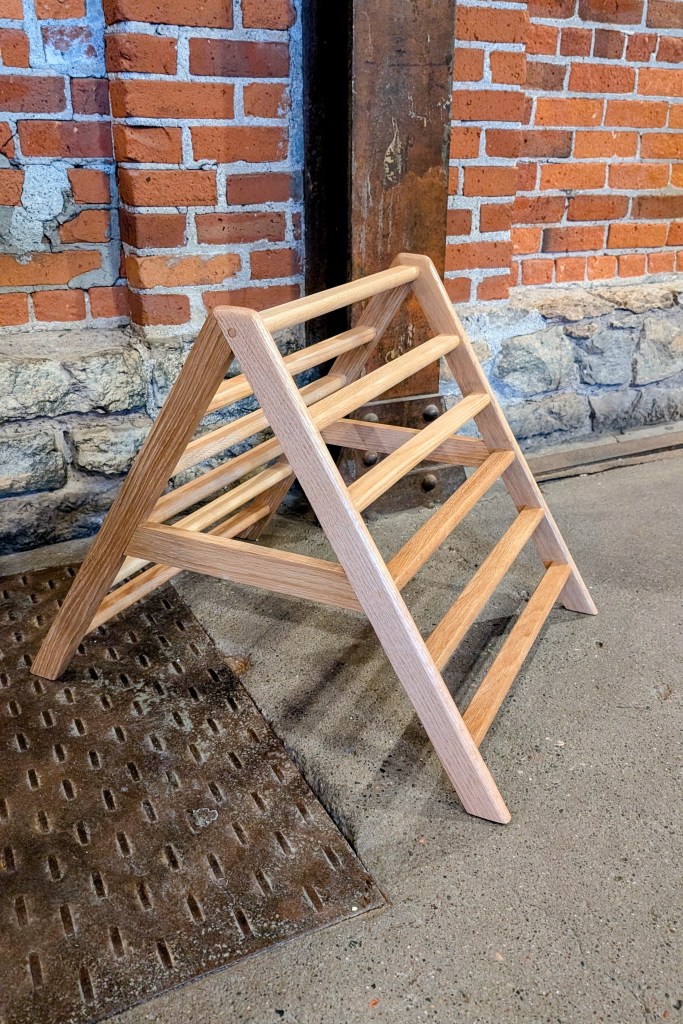
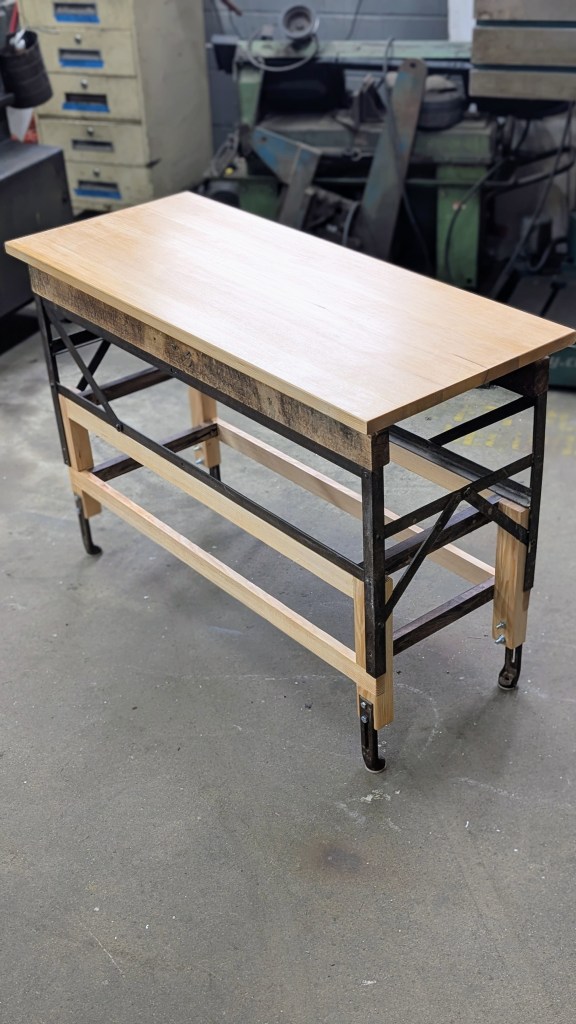
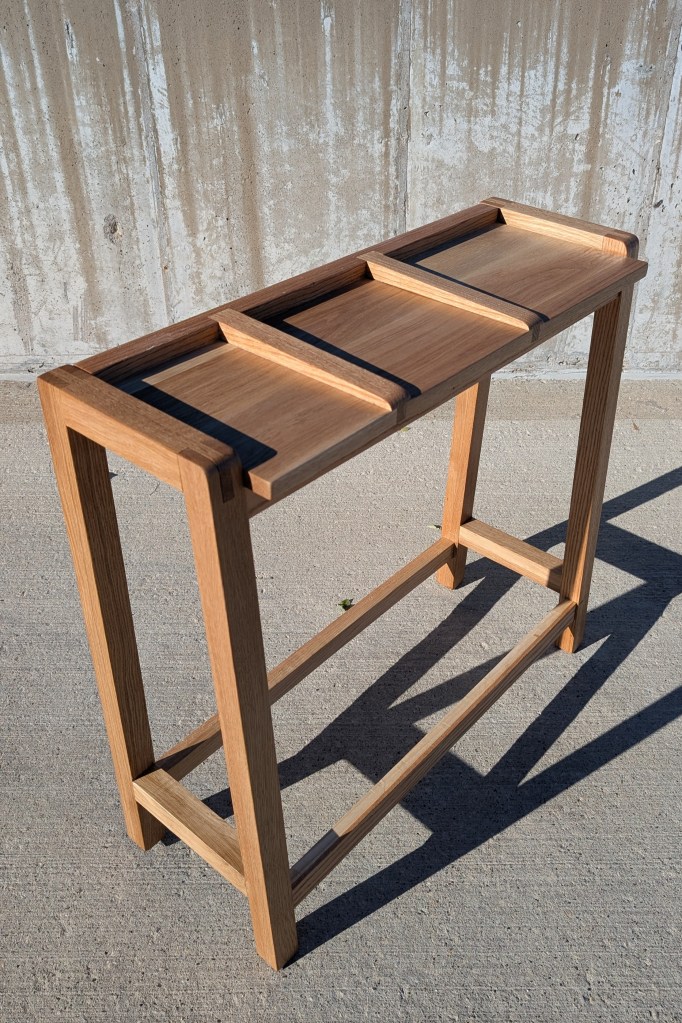
Wall mounted foldable clothing rackKids climbing triangleRe-imagined iron workbench transformed to a side tablePortable drink tableEntry table with segmented topCantilevered work table
Each piece is inspired by antiques using traditional joinery to create unique and beautiful furniture that lasts generations. I stand behind all my work and guarantee all my joinery for the lifetime of the object.
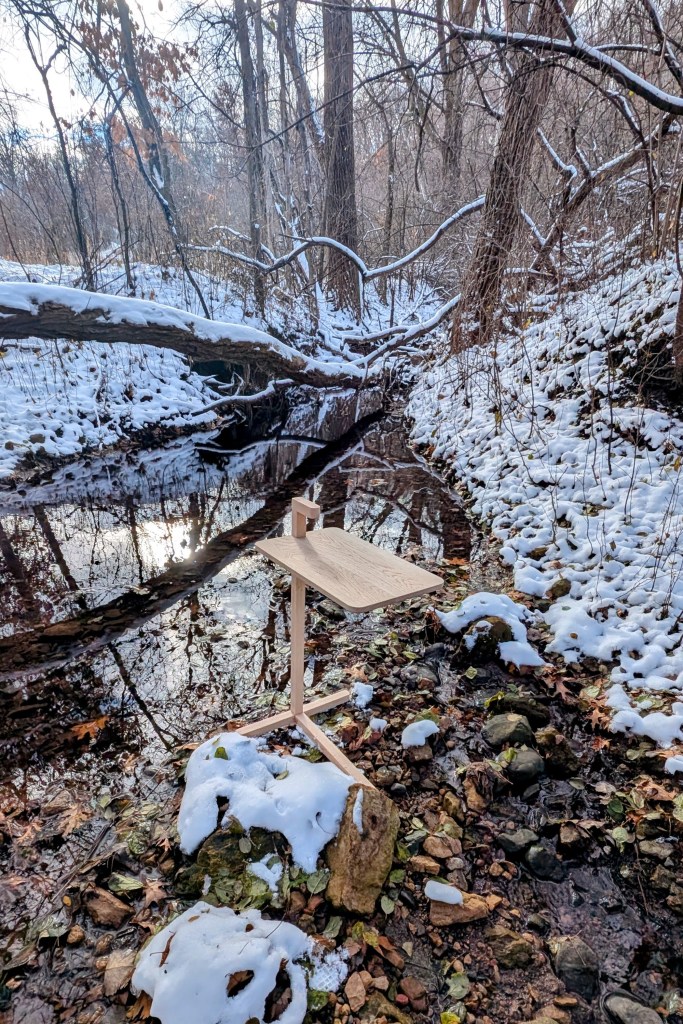
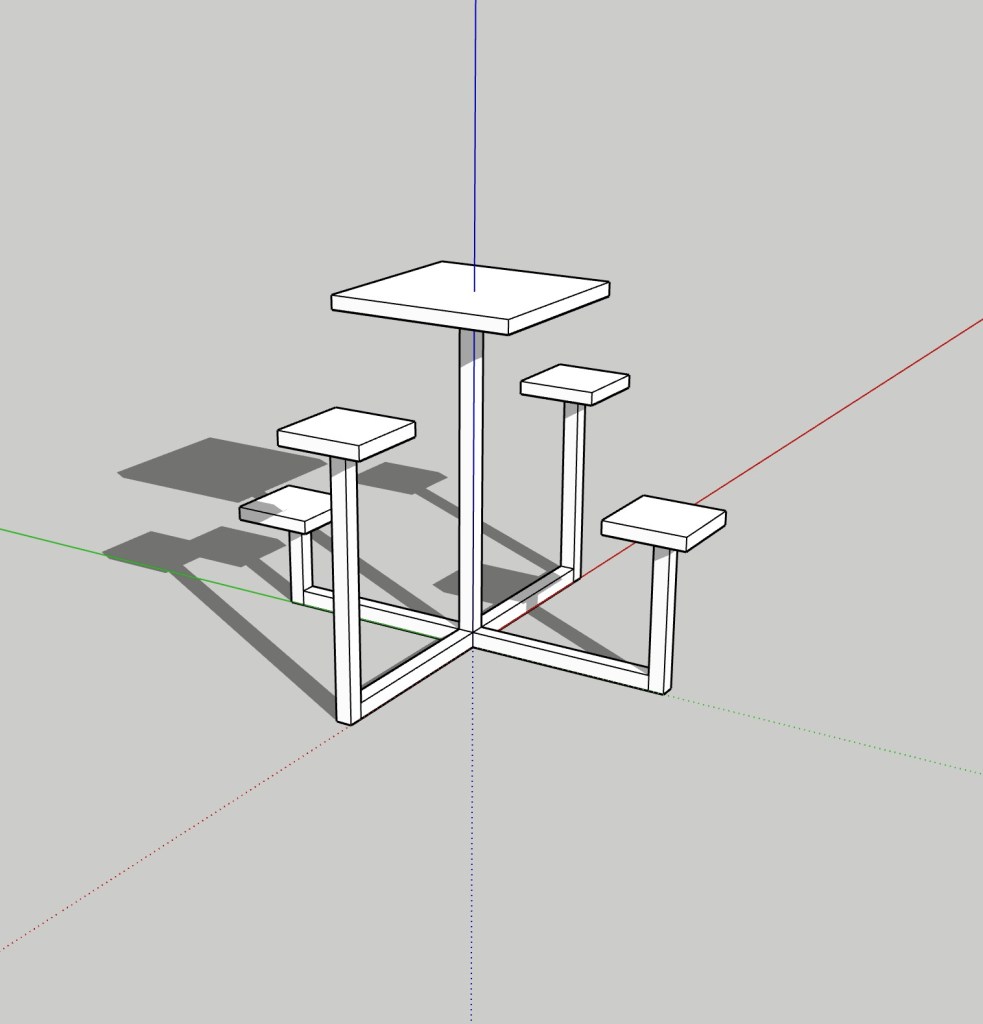
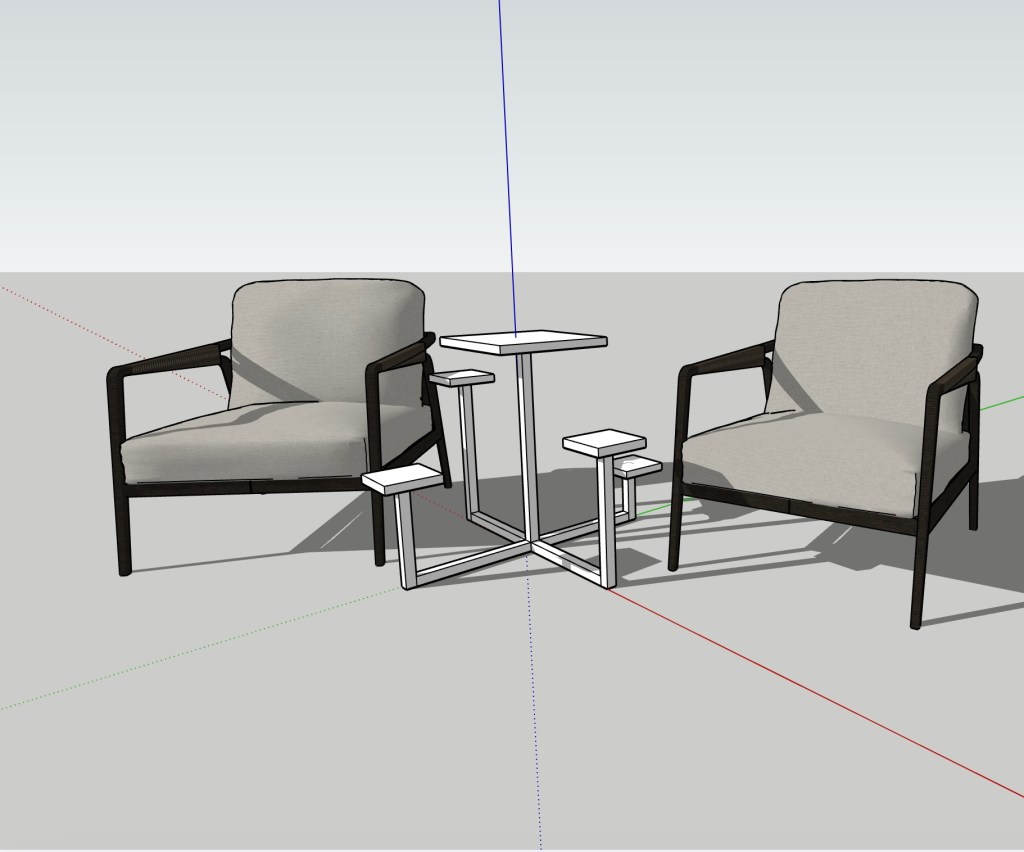
For over a year, I have been attracted to the idea of a piece of furniture called a “what-not”. It usually consists of slender uprights that supporting a series of shelves for holding curios, oddities, or so called “what-nots”. Like the drink table it fits into my growing “library” collection of small affordable pieces.
I engineered a simple base and created a forest of small table tops each capable of holding a single drink, small plant, notebook or small oddity. Then I worked out scale and size against a set of lounge chairs.
It is lightweight being not over-engineered. It does not depend much material, so it can be affordably sourced.
It also allows me to feature precise castle, bridle and mortise joints making it an affordable featured piece. Like my drink table it is unexpectedly sturdy by virtue of the joinery and can withstand kids or cats.
Look for the new what-not in the store during this 2025 holiday season. It would make a nice gift to a loved-one who wants to present their beloved collection of what-not’s.
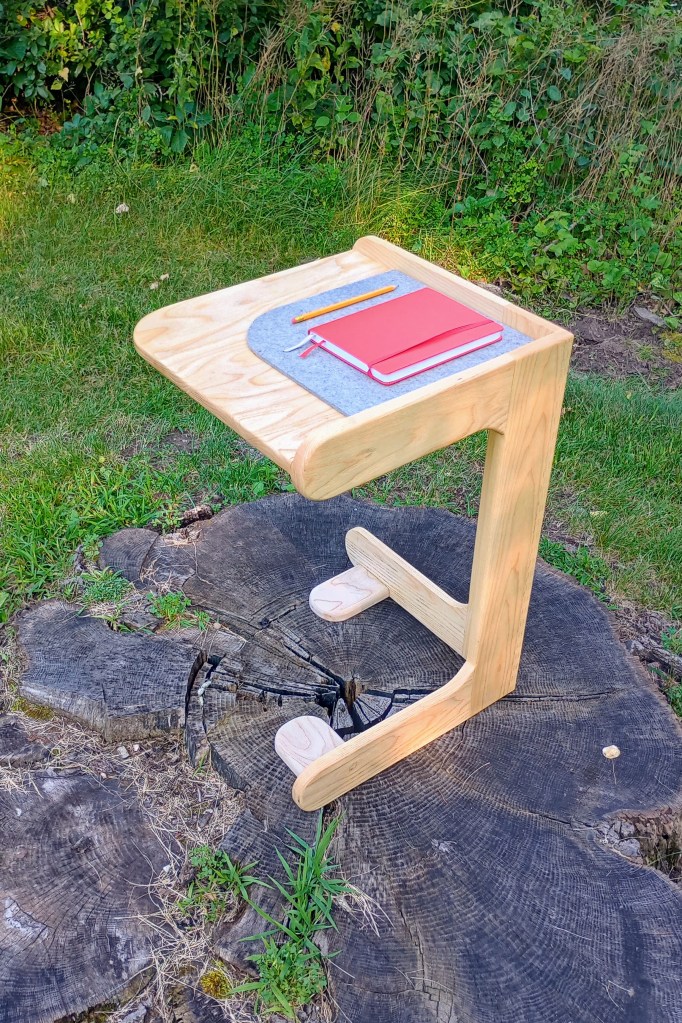
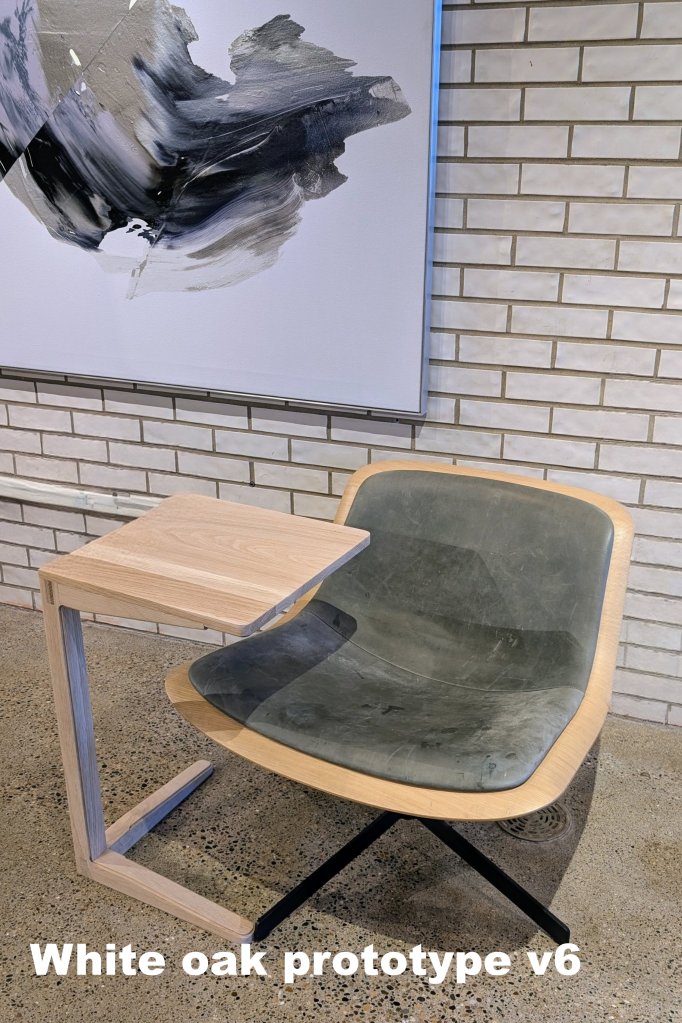
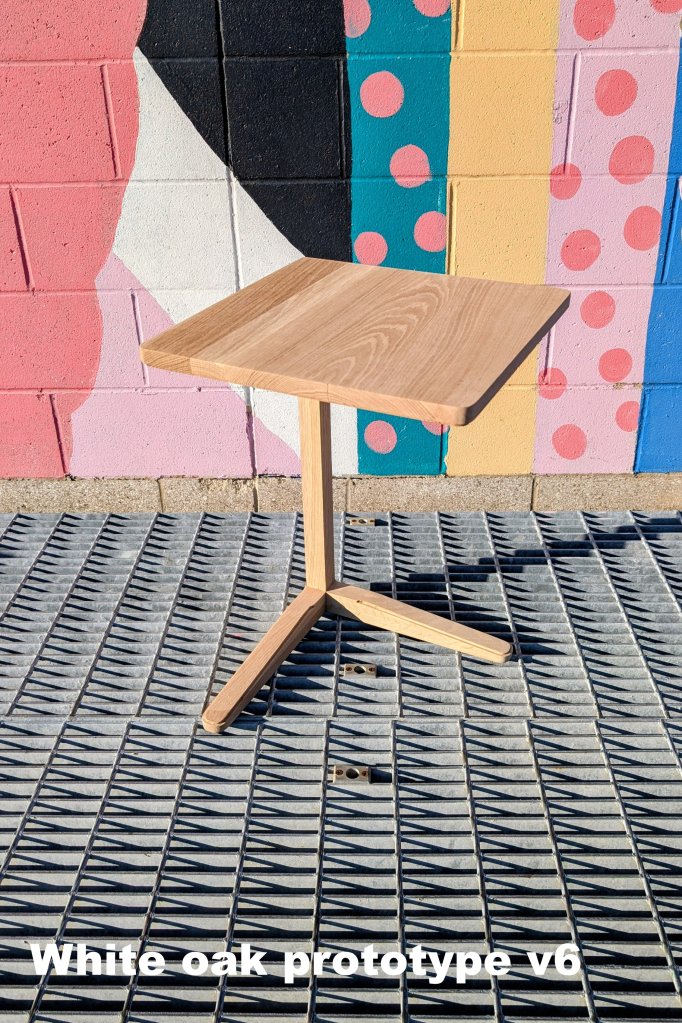
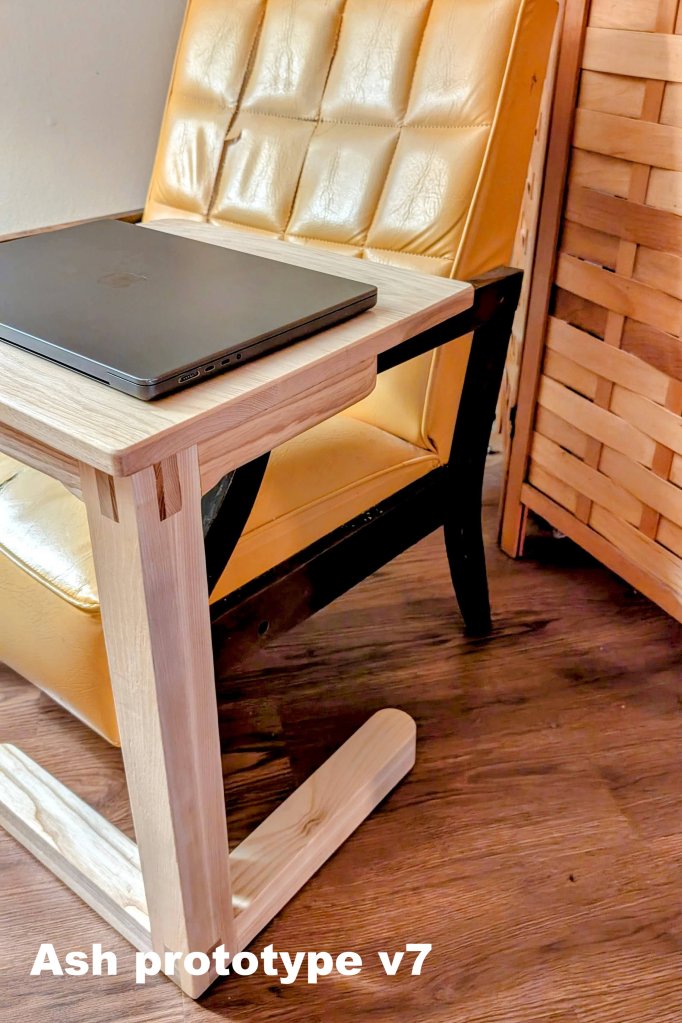
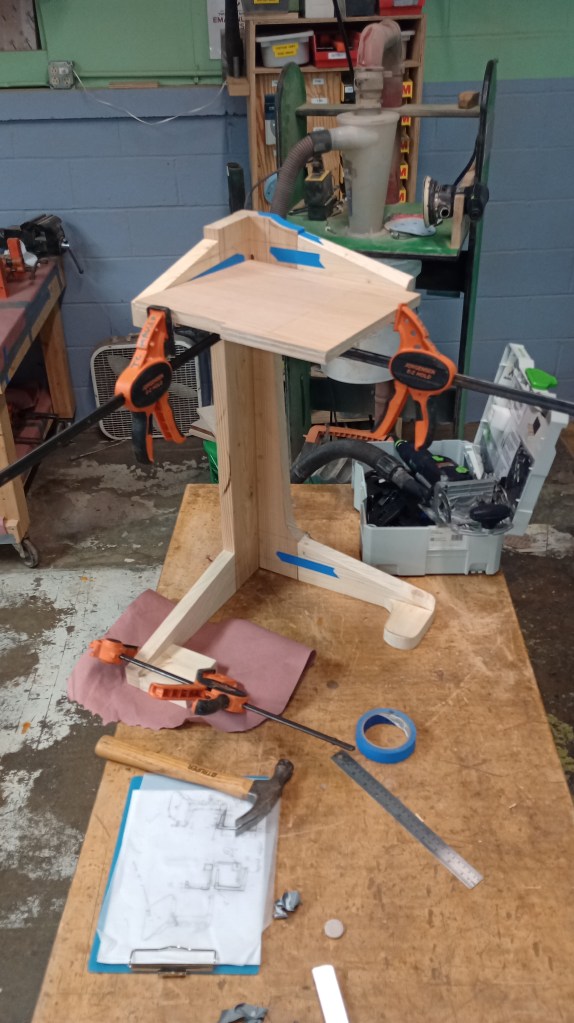
For the last year and a half, I have been working on a cantilevered working desk that can be used to work comfortably from any chair or sofa. I have built about 8 prototypes which are chronicled here.
The form has evolved to meet three simple requirements. It needed to be lightweight, sturdy and portable. I insisted on a cantilevered top to offer a large work space and efficient base that fits under and around chair legs.
The first idea involved a large box joint to create a corner and formed the base. This was lightweight but looked flimsy. I then started using a castle joint. It is an ideal solution that does not feel over-engineered.
In the version 6 prototype, I found the right thickness of the legs and feet (42mm), and then also solved how to integrate correct size base with the top. It create a simple profile. This is elegant, minimal but comfortable. I am not a minimalist as I find it uncomfortable, but in this case it is well suited.
The cantilevered form solves many problems in small spaces as its foot print is less demanding. So I see extending this into an entry console and compact writing desk. I will also explore this form as a drop table.
With this project, I also see cleaver ways to keep costs down for custom furniture. The materials for this piece can be cut offs with nothing over 24 inches long required. I expect as I perfect the process of cutting castle joints, this piece can be made quickly out of quality hardwood. I want to make accessible custom furniture. Anyone can make a side table for $500.
Have you ever felt scattered while working on a project? Or maybe you’re in the middle of a task and you realize your space and your mind are a mess. It’s in these moments that I turn to knolling.
Knolling is the practice of organizing objects in a visually pleasing way, arranging them parallel or at 90-degree angles. It’s a simple act that clears the clutter, not just on your table, but in your head. For me, it’s the perfect way to reset and get my focus back.
While I used to knoll on my coffee table or kitchen counter, I found these large, open surfaces actually promote chaos, tempting you to pile things up without a system. And drawers and boxes hide your things and give you the illusion of order.
I discovered that the key to a successful, sustainable knolling practice is using trays. The right set of trays provides a defined structure, turning a large surface into a series of smaller, more manageable segments. These simple boundaries encourage you to be deliberate with your items instead of just “dumping” them.
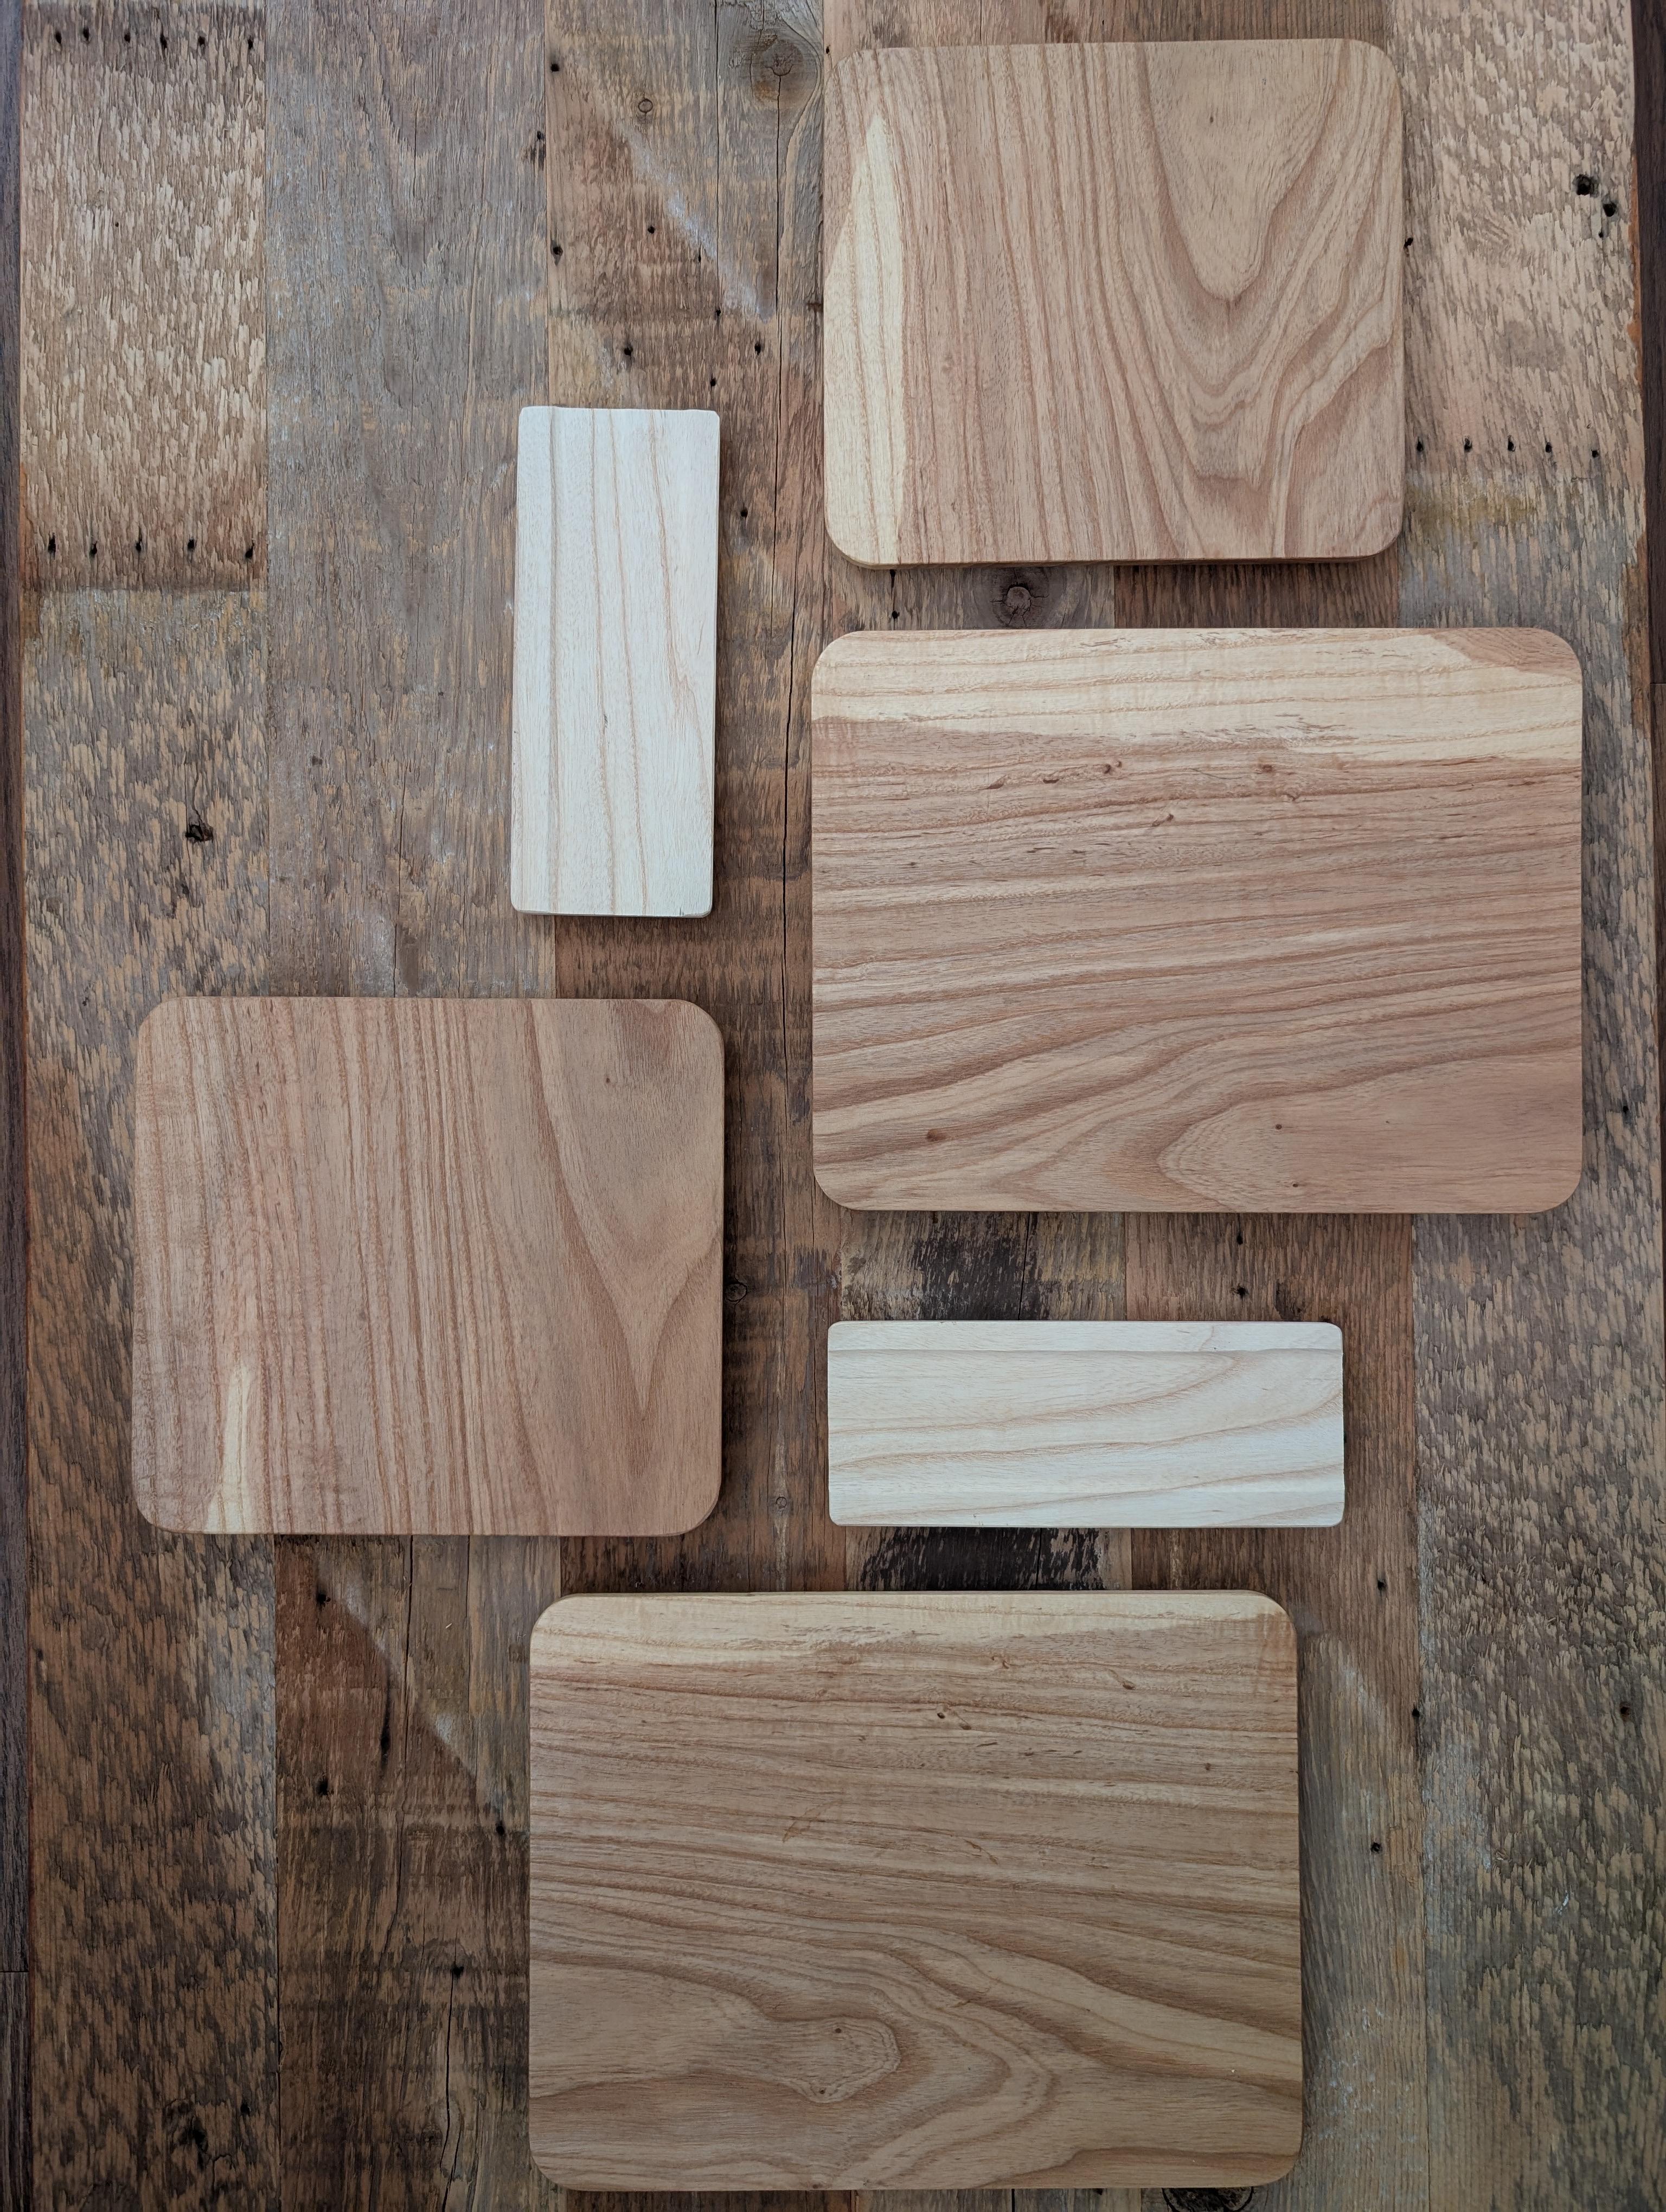
It’s with this idea that I designed my new knolling trays.
My Knolling Trays Are totally unique
I created these trays to be more than just a place to put things. They’re a tool for clarity and control. Their various sizes, thicknesses, shapes, and textures break up a surface, encouraging a habit of organization for your everyday items.
They give structure. The defined edges and flatness transform a chaotic tabletop into an orderly workspace.
They bring a sense of calm. Seeing all your essentials neatly arranged in an aesthetically pleasing way makes you feel in control, even when a task feels overwhelming.
They are beautiful on their own. Even when empty, the trays bring a sense of order and warmth to your space. You’ll never feel the need to hide them away.
My knolling trays aren’t just about making your space look better; they’re about helping you find a sense of calm and focus. They turn a messy surface into a source of inspiration and control.
Swipe left and right to see how I knolled today.
A Tray is a Tray… So Why Buy One?
It’s easy to look at a tray and think you can just make one yourself. While a tray might seem like a simple object, the reality is that the best home accessories are made with intention.
You can certainly find or build a simple solution to hold your things, but the design and craftsmanship of a dedicated set of knolling trays make all the difference.
Thoughtful Design:Knolling trays by Tim B Studio aren’t just flat surfaces. I consider the pleasing sizes and shapes to segment a workspace, encouraging you to interact with your items in an intentional, organized way. The specific dimensions and subtle details are what transform a simple object into a tool for focus.
Craftsmanship and Quality: These are pieces built to last. I’ve selected beautiful, durable hardwood and finished them to stand up to daily use while still looking elegant. The smooth textures and natural grains are a constant, tactile reminder of quality and care.
Aesthetic and Purpose: My trays are designed to be seen. Unlike a plain box or a quick DIY fix, they are an extension of your personal style and a testament to your commitment to a more organized, mindful life. They add a quiet structure to your surroundings, making your space not only functional but also a source of pride.
This isn’t about simply containing clutter; it’s about investing in a habit. It’s about surrounding yourself with beautiful, well-made objects that inspire a sense of calm and control.
When you buy one of my knolling trays, you’re not just purchasing a piece of wood—you’re getting a meticulously crafted tool to help you find your focus, one perfectly-placed item at a time.
A Commitment to Craft and Community
When you buy one of my knolling trays, you are not just getting a beautiful, functional object. You are also supporting local woodworking and a commitment to sustainability.
Each tray is created from hardwood offcuts, sourced right here in the Twin Cities. I work with species native to the area, including ash, hickory, elm, white and red oak, and maple. This ensures that high-quality wood that might otherwise be discarded gets a new life.
The trays are finished with all natural shellac, a simple and non-toxic finish that is easy to repair and emits no harmful VOC gases.
The idea of knolling is simple: it’s the practice of arranging objects on a flat surface in a grid-like pattern to create visual harmony. Think of a perfectly organized toolbox or a beautifully laid-out workbench. It’s an act of ordering which makes me feel calm and focused.
But what if you didn’t have to find order? What if I created it from scratch?
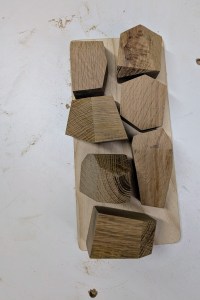
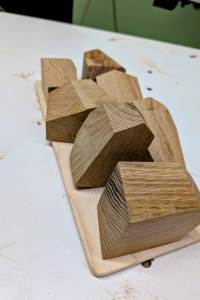
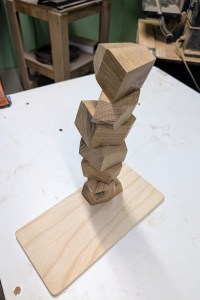
I always have wood cut offs and found myself in the shop, cutting and sanding them into different shapes and sizes. It ended as a set of simple, smooth wooden “rocks.”
Then I placed them on a small tray on my kitchen table, arranging them in a clean, grid.
When I felt overwhelmed or my handed needed to do something, I found myself going to the tray, knocking the rocks over, and then carefully balancing and stacking them.
It was a tangible, low-stakes way to engage my hands and mind without the baggage of real-world tasks. I wasn’t trying to organize the chaos of my life; I was creating a temporary order.
The prototype set I made for my daughter became a tool for her to play, calm down, and focus. Now, I’m developing a full set of Knolling Rocks to share with others. My hope is that they can be a simple, beautiful tool for anyone looking for a moment of calm and focus.
The world is full of things to be done and problems to be solved. Sometimes, what we really need is a simple, beautiful problem we can solve with our own hands. Something we can knock over, rearrange, and put back together again—just for the joy of it.
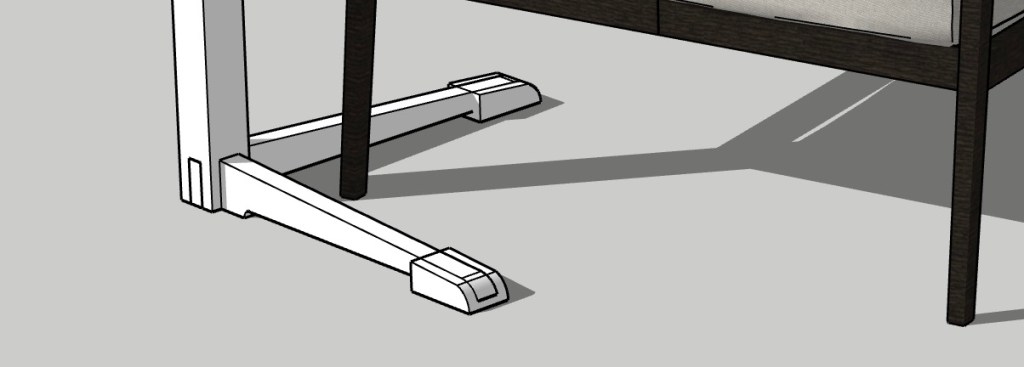
I did finish the updated work table and delivered it. Then got an email that one of feet failed.
When I investigated, the table was used with a fairly heaving rocking lounge chair. When the chair frame tipped forward, it applied a racking force to the foot. Racking force is when a joint is pushed laterally from the side, rather than straight down. The leg failed along the vertical grain just after the mortise. This highlighted a couple design issues:
Table was not designed to be used with a rocker, but that is what happened. I design for real use.
The height of the foot was enough create a lever that created the racking force.
The floating mortise joint did not fail.
The table was easily repaired but the flaw still remains.
New Design Needed
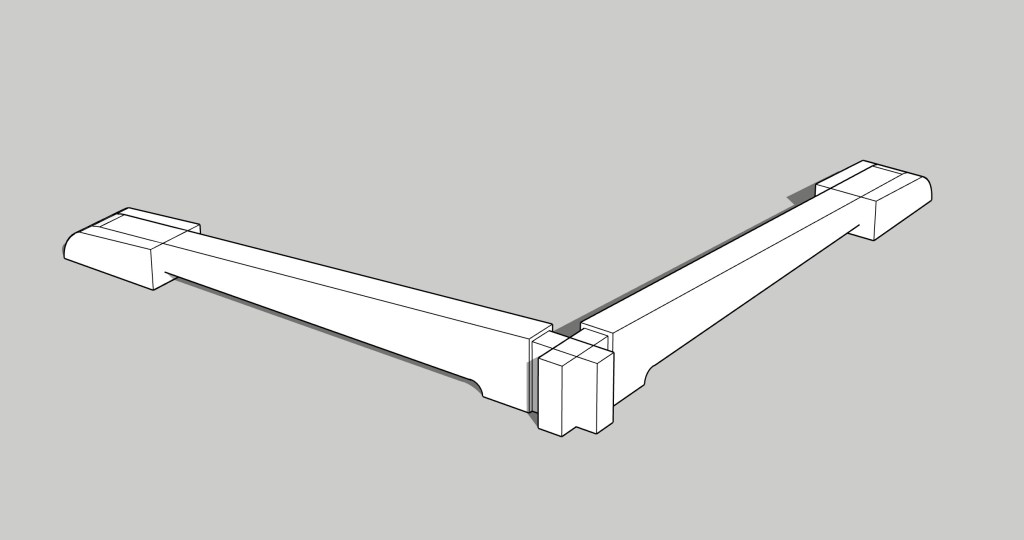
This table needs to be portable and sturdy so it can be pulled in close to chairs and sofas. The issue with the failed design is in the decision to have the leg “flow” into the foot using a curve.
It does not seem possible to curve the leg into foot and cantilever the top. The curve is not needed to deliver on the design brief.
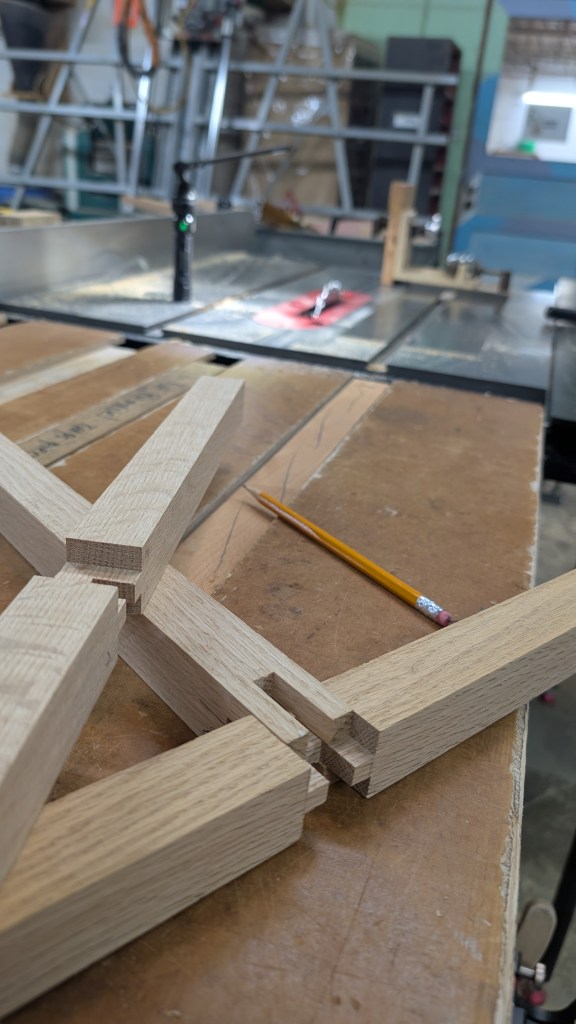
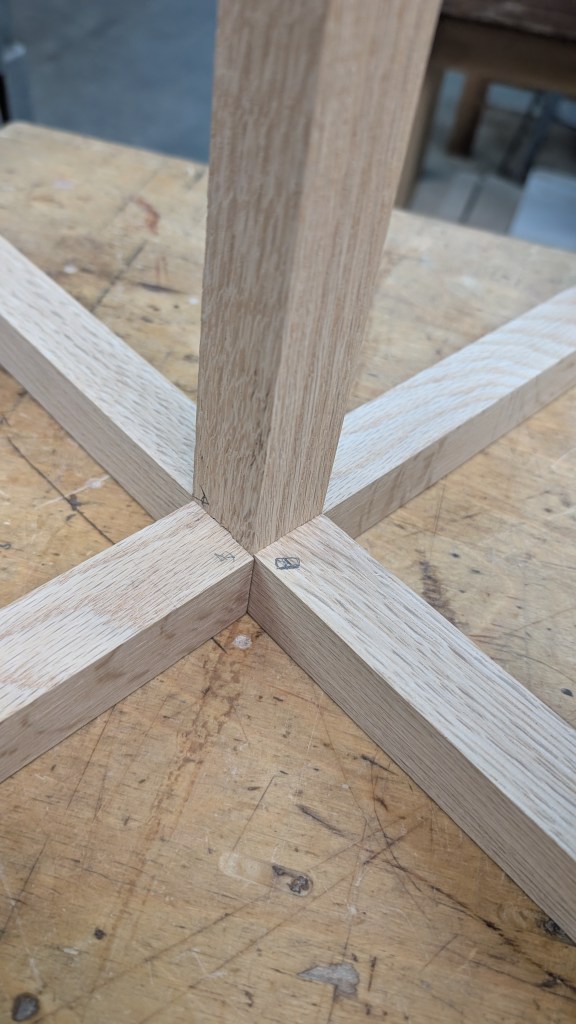
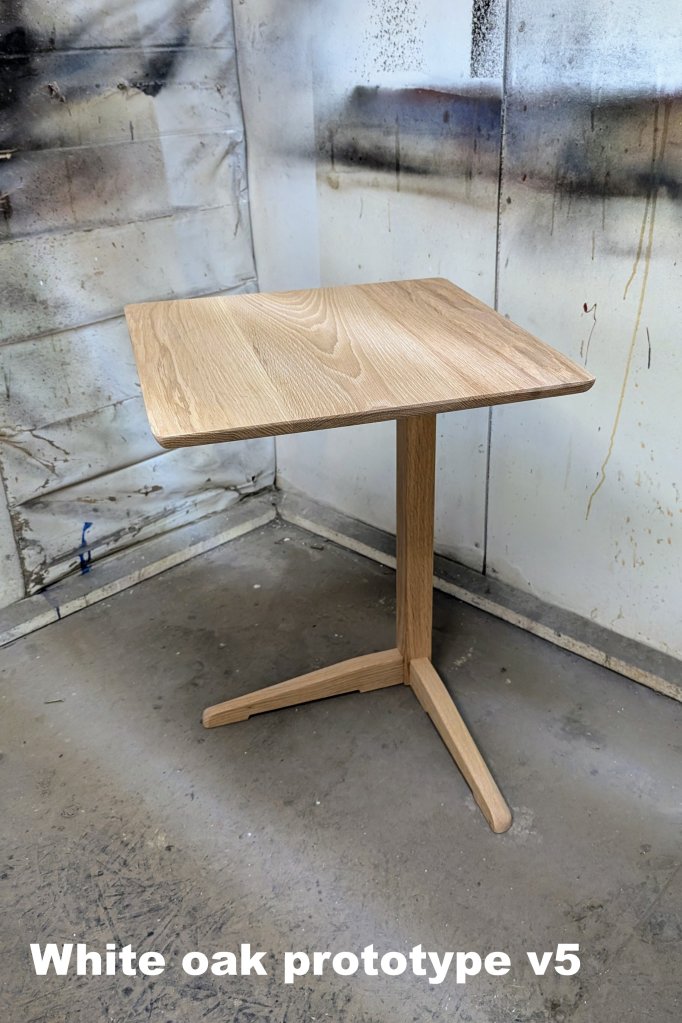
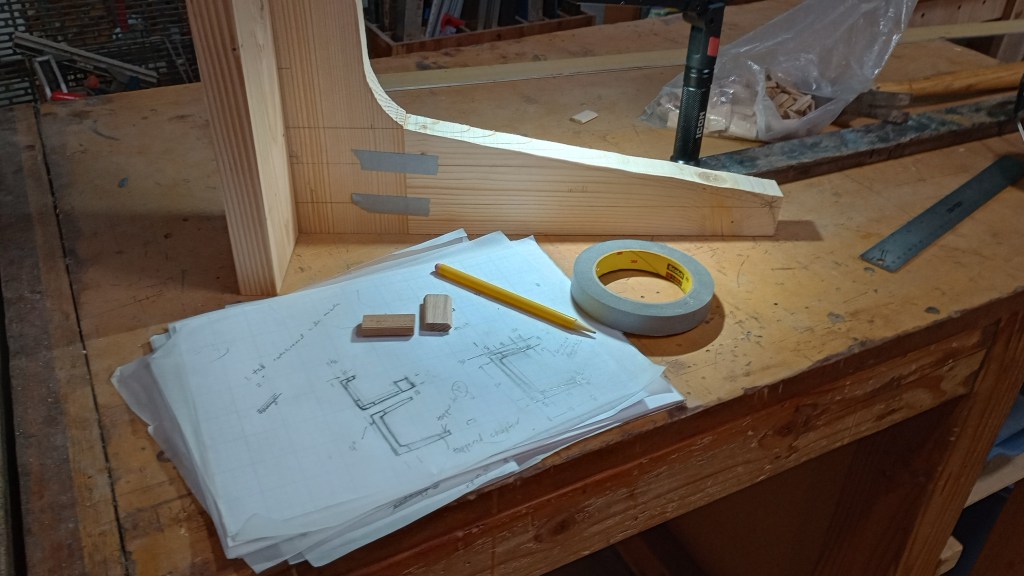
I reviewed my sketches and decided on featuring a castle joint. The joint interlocks of all three pieces of wood making up the leg and both feet. The 2 feet are joined with a half-lap joint and this assembly then fits into slots into a thicker leg.
This design eliminates the non-traditional box joint for the leg and replaces it with more traditional joint.
The cantilevered top and corner leg frame allow the user to pull the table surface in close. The added “toes” should allow it to slide under furniture with more durability. I hope it will also allow it to be used on thicker carpeting.
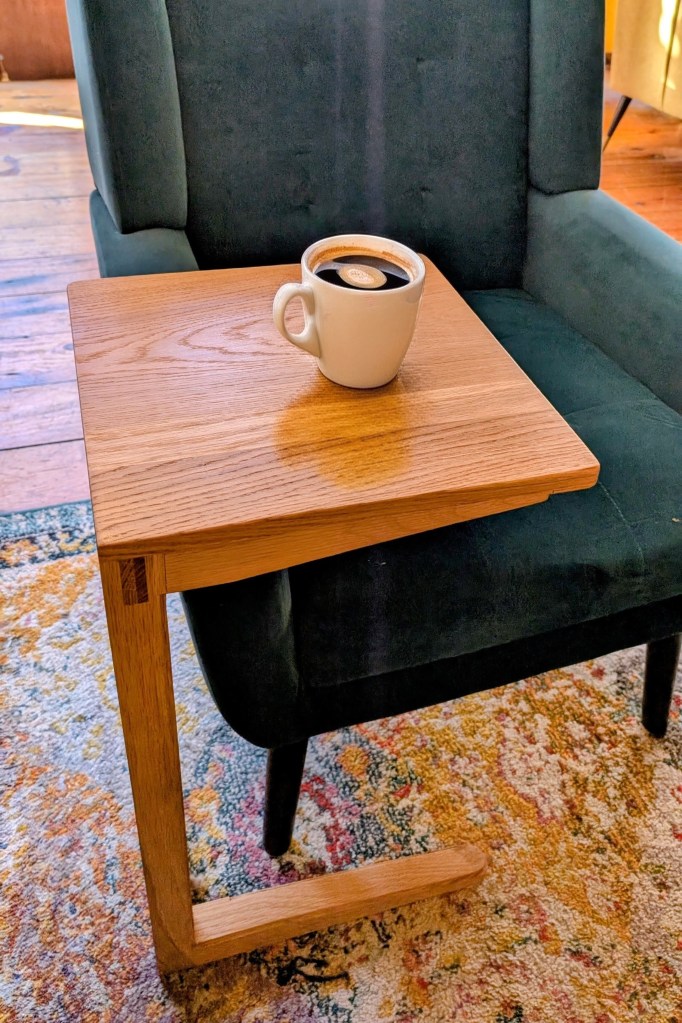
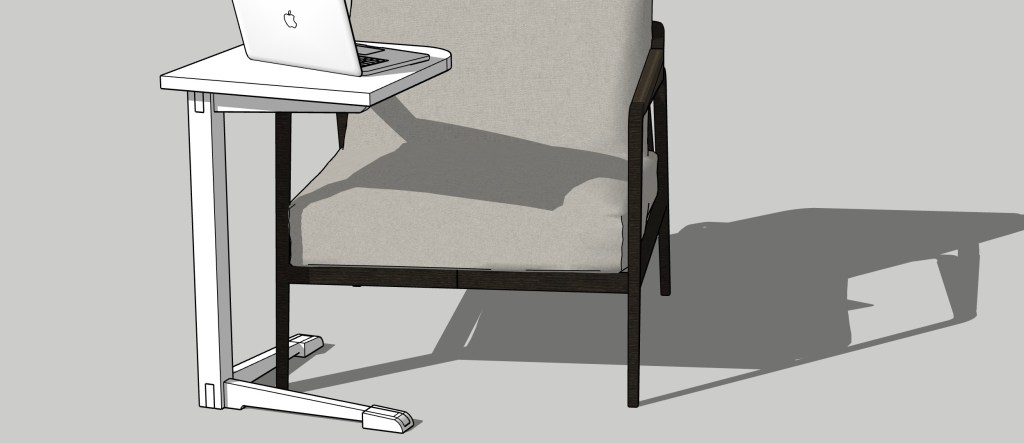
I have used my first work from home side table for almost over year. And wanted document how I created the second version of this useful table. This time I want to make a slightly taller and more stable while refining the cantilevered base.
My goal is to turn a corner of my living room into a productive workspace. This table embodies the idea of form after purpose. The side table offers a stable surface for your laptop, book, or dinner. You can pull it closer because it is cantilevered. Its base allows it to slide around the legs of a lounge chair.
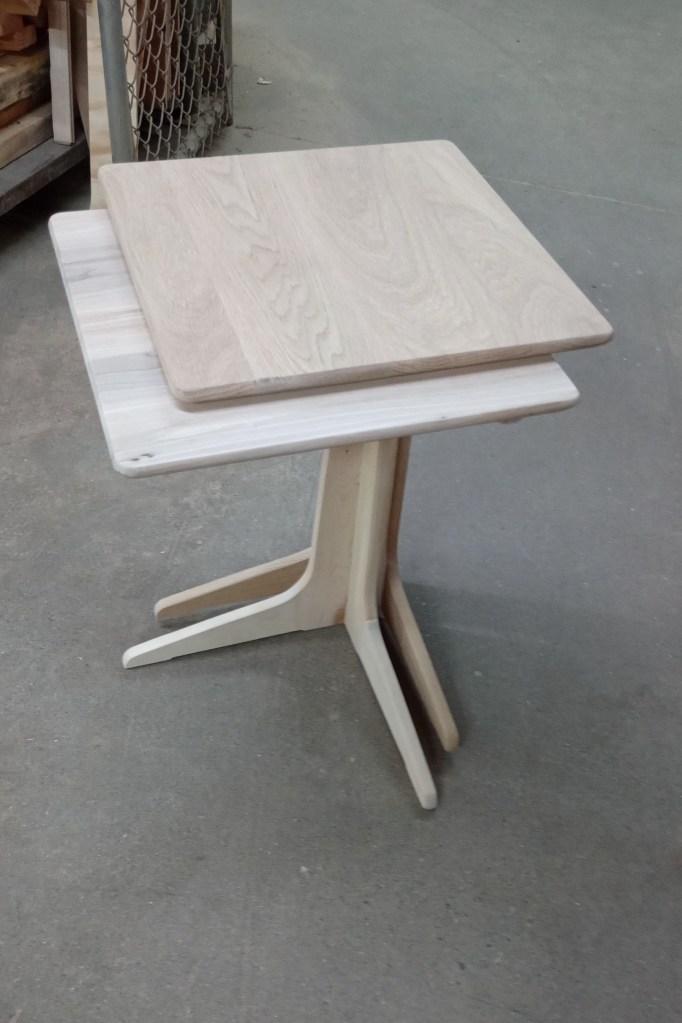
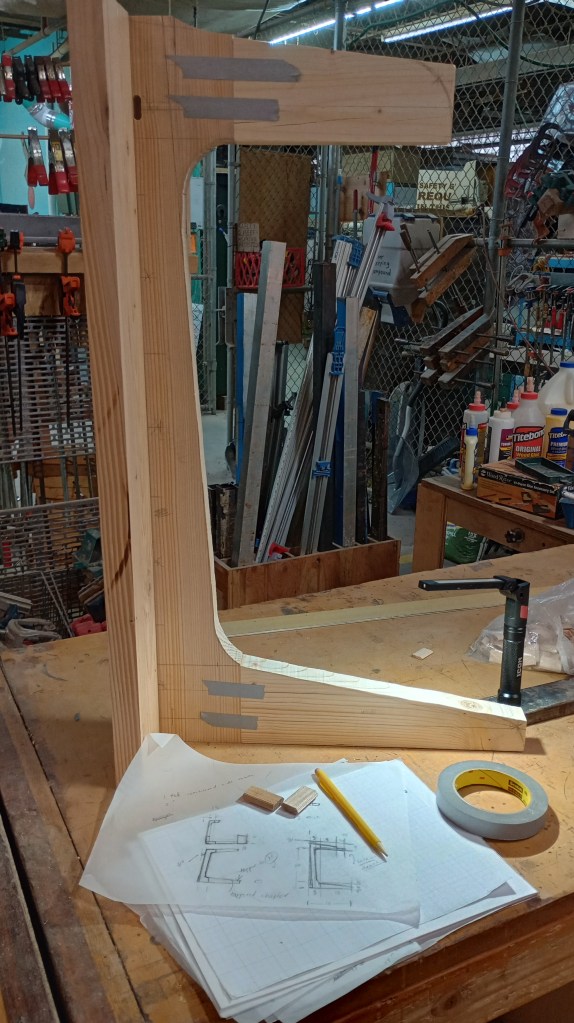
Instead of designing my new piece using CAD software, I started with tracing paper and pencil sketches. As the stability of this piece is key, I needed to make a full scale prototype. I can test the large 16 inch square table top against the 18 inch base. I also worked out chamfered tappers to achieve a pleasing line. And finally I can get a sense of how to best assemble it.
My first sketches and prototypes
I worked out the construction of a 26 inch tall base verses 23 inches. This is to meet the requirements of the client whose lounge chair has high arm rests.
This above prototype uses the loose mortise joints. Still, I am considering true mortise and tendon joints. I am also thinking of going again with box joint for the spine. It is super stable on hardwood floors and acceptably “tippy” on thick carpet.
The top is shaped to be inviting. It can be pulled in close. The height is comfortable for typing or writing.